Thursday, March 31, 2016

X++ Code to Insert image for an Item in Ax 2012

Note : The below Code is works for Only released Products

static void insertimage(Args _args)
{
    DocuActionArchive               docuActionArchive;
    EcoResProductImageManagement    productImageManagement;
    EcoResProductImageThumbnail     ecoResProductImageThumbnail;
    DocuRef                         docuRef;
    DocuValue                       docuValue;
    EcoResProductImage              ecoResProductImage;
    InventTable                     inventTable;
// Specify the display product number

    InventTable = InventTable::find("D0004");
    ttsBegin;
    docuRef.TypeId     = "File";
    docuRef.RefTableId = inventTable.TableId;
    docuRef.RefRecId   = InventTable.RecId;
    docuRef.RefCompanyId = inventTable.dataAreaId;
    docuRef.ActualCompanyId = curext();
    docuRef.insert();
    docuActionArchive = DocuAction::newDocuRef(docuRef);
    docuActionArchive.add(docuRef,"C:\\Users\\radhika.j\\Desktop\\download.jpg");

    ecoResProductImage.RefRecId         = docuRef.RecId;
    ecoResProductImage.RefRecord        = docuRef.RefRecId;
    ecoResProductImage.FileName         = "download.jpg";
    ecoResProductImage.Usage            = EcoResProductImageUsage::External;
    ecoResProductImageThumbnail         = new EcoResProductImageThumbnail(false);
    ecoResProductImage.MediumSize       = ecoResProductImageThumbnail.generateThumbnail(204,204,docuRef);
    ecoResProductImage.ThumbnailSize    = ecoResProductImageThumbnail.generateThumbnail(48,48,docuRef);

    if (ecoResProductImage.MediumSize == connull())
    {
        info("@SYS301935");
    }
    if (ecoResProductImage.ThumbnailSize == connull())
    {
        info("@SYS301936");
    }
    ecoResProductImage.insert();
    ttsCommit;
}

Note: if you face any error like "Document management directory does not exist." while doing this 
just go with fix errors select the New Path For Active Directory and Proceed Forward 

Wednesday, March 30, 2016

How to Insert Image in Ax table Using X++ in Ax 2012

How to Insert Image in Ax table Using X++ in Ax 2012


http://aspcodder.blogspot.in/2016/03/how-to-insert-image-in-ax-table-using-x.html
In this Example we will see How to Insert Image in Ax table and Retrieve from Sql. First Create table in Ax and Create Jo for insert image in table.

Create table from AOT Node.
Step 1: Create Table Name it “A_ImageTable”. And Insert Container Filed in Table.

  • Expand AOT Node.
  • Open Data Dictionary Node.
  • Select Tables and right Click Select New Table.
  • Name it “A_ ImageTable”.
  • Now open table in Insert Some Data in A_ ImageTable table.

Create Job from AOT


  • In the AOT, click Job.
  • Right-click the Job node, and then select New Job.

static void ImageField(Args _args)
{
    BinData binData = new BinData();
    A_ImageTable table;
    dialog               d;
    Dialog                      dialog = new dialog();
    dialogField                 dialogFilename;
    //COM wordDocuments;
    FileName                    fileName;
    container imageContainer;
    str imageFilePathName;
    d = new dialog();
    d.caption("select a Image file");
    dialogFilename = d.addField(extendedTypeStr(FilenameOpen),"File Name");//add a field where you select your file in a specific path
    d.run();//execute dialog
    if(d.closedOk())
    {
        filename = dialogFileName.value();//return path file value
    }
    imageFilePathName=filename;
    if ( WinAPI::fileExists(imageFilePathName))
    {
        binData.loadFile(imageFilePathName);
        imageContainer = binData.getData();
        //table.Image = _Party.RecId;
        table.Image = imageContainer;
        table.insert();
    }
}

Now run your Created Job and Select Image File for FileDialogBox and Click OK and See Output in your table.

Tuesday, March 29, 2016

Dynamics AX Tutorial - X++ Containers Functionality


Why Containers?

  • In X++ (Object oriented programming language) the data or values stored in a Variable are of below types:
    • Primitive dataTypes - int, str, real .... etc.
    • Composite dataTypes - Arrays, Containers, Collection Classes
    • Temporary Tables
  • For instance,
    • Primitive dataType variable can hold only 1 value and that too of same dataType, if you want to store 500 values then you have to create/declare 500 variables and intialize them, also it doesn't support variables of different dataTypes. To overcome this problem AX provides composite dataTypes arrays and containers, however arrays solve the former but supports only one dataType.
    • Container solves this problem by storing many elements of different dataypes. However there are few limitations with Containers like "container cannot store objects" and "performance implications" and they can be addressed by collection classes and temporary tables concepts. Containers are most frequently used in AX development so let us explore Containers and its features.

Features of Containers:

  • A container is a "composite data type"
  • A container is 1 based not 0 based.
  • A container is not a class therefore classes/objects cannot be passed/put into a container.
  • A container contains an ordered sequence of values (primitive dataTypes - int, str, real, date, boolean, enum etc.) or other containers or/and some composite data types.
  • A container is a "PASS BY VALUE" type not "pass by reference" type which means while passing container the copy of container with values is passed not the reference.
    • Therefore, any variable declared as a container is automatically initialized to an empty container that contains no values.
  • A container is IMMUTABLE which means a container is never modified with any functions rather all X++ statements acting on a container are internally building a new container.
    • For example assignment of a container to another container variable and container functions such as conIns(), conDel(), conPoke(), += etc. are actually creating a new copy of the container.
  • A container can be stored in the database as a dataBase coloumn created through AOT especially used to store images/files as a blob.

Container Functions:

  • Below are some of the most common container functions with examples.

1. conPeek() Function

  • The conPeek() is used to retrieve a specific element from a container.
  • Syntax: anytype conPeek(container container, int number)
    • container - The container to return an element from.
    • number - The position of the element to return. Specify 1 to get the first element.
  • Return value: The element in the container at the position specified by the number parameter. The conPeek function automatically converts the peeked item into the expected return type.
EXAMPLE:
void daxErp_conPeek()
{
    // container declaration and initialization with 2 values
    container daxConBeta = ["Welcome", 8594]; 
    str charHolder;
    ;

    // conPeek() function returns the value being held in a specific position in the container. 
    // (Note: It returns anyType)
    // Here printing 1st and 2nd values from daxConBeta to info
    charHolder = conPeek(daxConBeta, 1);
    info(strFmt("Container daxConBeta conPeek() values are :- 
    %1, %2", charHolder, conPeek(daxConBeta, 2)));
}

2. conPoke() Function 

  • The conPoke() is used to modify a container by replacing one or more of the existing elements.
  • Syntax: container conPoke(container container, int start, anytype element, ...)
    • container - The container to modify.
    • start - The position of the first element to replace.
    • element - One or more elements to replace, separated by commas.
  • Return value: The new container with the inserted elements.
Example:
void daxErp_conPoke()
{
    // container declaration and initialization with 2 values
    container daxConBeta = ["Welcome", 8594]; 
    str charHolder;
    ;

    // conPoke() function usage 
    // (Replaces the value being held in a specific position in the container, with a new value)
    // Note: Here Replacing 2nd value (8594) with (29) in daxConBeta
    daxConBeta  = conPoke(daxConBeta, 2, 29);
    info(strFmt("Container daxConBeta conPoke() values are :- 
    %1, %2", conPeek(daxConBeta, 1), conPeek(daxConBeta, 2)));
}

3. conIns() Function

  • The conIns() is used to insert one or more elements into a container.
  • Syntax: container conIns(container container, int start, anytype element, ...)
    • container - The container into which to insert elements.
    • start - The position at which to insert elements.
    • element - One or more elements to insert, separated by commas.
  • Return value: The new container with the inserted elements.
Example:
void daxErp_conIns()
{
    // container declaration and initialization with 2 values
    container daxConBeta = ["Welcome", 8594]; 
    str charHolder;
    ;

    // conIns() function usage 
    // (Inserts a value into a specific position in the container, index shifted next)
    // Note: Here Inserting value 299 at 2nd location and shifting the rest to the right!
    daxConBeta = conIns(daxConBeta, 2, 299);
    info(strFmt("Container daxConBeta conIns() values are :- %1 , %2, %3", 
    conPeek(daxConBeta, 1), conPeek(daxConBeta, 2), conPeek(daxConBeta, 3)));
}

4. Container insert operator +=

  • The += insert operator is used to insert one or more elements into a container.
  • += is faster than the conIns() function, however note that it inserts at the end after last index location. Therefore use this operation when insertion has no relevance to index position especially used in loops.
Example:
void daxErp_conInsOperator()
{
    // container declaration and initialization with 2 values
    container daxConBeta = ["Welcome", 8594]; 
    str charHolder;
    ;

    // += is faster than the conIns() function
    // however note it inserts at the end after last index location
    // Therefore use this operation when insertion has no relevance to index position
    daxConBeta += 2999;
    info(strFmt("Container daxConBeta += usage values are :- %1 , %2, %3, %4",
    conPeek(daxConBeta, 1), conPeek(daxConBeta, 2), conPeek(daxConBeta, 3), conPeek(daxConBeta, 4)));
}

5. conFind() Function

  • The conFind() is used to find the first occurrence of an element or a sequence of elements in a container.
  • Syntax: int conFind (container container, anytype element,... )
    • container - The container to search.
    • element - One or more elements to search for, separated by commas.
  • Return value: Returns 0 if the item was not found; otherwise, the sequence number of the item.
Example:
void daxErp_conFind()
{
    // container declaration and initialization with 2 values
    container daxConBeta = ["Welcome", 8594]; 
    str charHolder;
    ;

    // conFind() function finds position in the container that a certain value is being held (if found)
    info(strFmt("conFind() - Find '8594' value in daxConBeta container return if true(indexNo) else (0)
    :- %1", conFind(daxConBeta, 8594)));
    info(strFmt("conFind() - Find '2' value in daxConBeta container return if true(indexNo) else (0)
    :- %1", conFind(daxConBeta, 2)));
}

6. conLen() Function

  • The conLen() is used to retrieve the number of elements in a container.
  • Syntax: int conLen(container container)
    • container - The container in which to count the number of elements.
  • Return value: The number of elements in the container.
Example:
void daxErp_conLen()
{
    // container declaration and initialization with 2 values
    container       daxConBeta  =  ["Welcome", 8594]; 
    str             charHolder;
    ;

    // conLen() function returns the number of elements in the container
    // Here at this instance we have 2 elements []
    info(strFmt("daxConBeta conLen() container length is :- %1", conLen(daxConBeta)));
}

7. Container Retrieval Example

  • Below example shows the typical common scenario where the developer has to read the values from a container in a loop and perform other operations.
Example:
void daxErp_conLoopRetrieval()
{
    // container declaration and initialization with 2 values
    container       daxConBeta  =  ["Welcome", 8594]; 
    str             charHolder;
    int             conLength, cnt;
    ;

    // looping through container values and printing them to info
    // most common usage to retrieve values from passed container
    conLength = conLen(daxConBeta);
    info(strFmt("Container daxConBeta length/noOfValues = %1 and the values are below", conLength));
    for (cnt = 1; cnt <= conLength; cnt++)
    {
        charHolder = conPeek(daxConBeta, cnt);
        info(strFmt("Container daxConBeta %1 value = %2", cnt, charHolder));
    }
}

8. conDel() Function

  • The conDel() is used to remove the specified number of elements from a container.
  • Syntax: container conDel(container container, int start, int number)
    • container - The container from which to remove elements.
    • start - The one-based position at which to start removing elements.
    • number - The number of elements to delete.
  • Return value: A new container without the removed elements.
Example:
void daxErp_conDel()
{
    // container declaration and initialization with 2 values
    container daxConBeta = ["Welcome", 8594]; 
    str charHolder;
    ;

    // conDel() function removes a value from a specific position in the container.
    // Here removing 1 value starting from 2nd location
    daxConBeta = conDel(daxConBeta, 2, 1);
    info(strFmt("Container daxConBeta conDel() values are :- 
    %1, %2", conPeek(daxConBeta, 1), conPeek(daxConBeta, 2)));
}

9. conNull() Function

  • The conNull() is used to retrieve an empty container. Use this function to explicitly dispose of the contents of a container.
  • Syntax: container conNull()
  • Return value: An empty container.
Example:
void daxErp_conNull()
{
    container daxConAlpha; // container declaration
    str charHolder;
    ;
    // container initialization with 4 values
    daxConAlpha = ["Finance", "T&L", "Retail", "Manufacturing"]; 

    // conNull() resets and returns an empty container
    // Here resets 4 values ("Finance", "T&L", "Retail", "Manufacturing") in daxConAlpha to null
    info(strFmt("Container daxConAlpha conNull() values before are :- %1 , %2, %3, %4",
    conPeek(daxConAlpha, 1), conPeek(daxConAlpha, 2),
    conPeek(daxConAlpha, 3), conPeek(daxConAlpha, 4)));
    
    daxConAlpha = conNull(); // set con null
    
    info(strFmt("Container daxConAlpha conNull() values after are :- %1 , %2, %3, %4",
    conPeek(daxConAlpha, 1), conPeek(daxConAlpha, 2),
    conPeek(daxConAlpha, 3), conPeek(daxConAlpha, 4)));
}

10. con2Str() Function

  • This a Global class method which retrieves a string of the elements in the specified container. If no value for the sep parameter is specified, the comma character will be inserted between elements in the returned string. The returned string cannot have more than 1000 characters.
  • Syntax: client server public static str Con2Str(container c, [str sep])
    • c - The container to convert.
    • sep - The string to use as a separator between elements; optional.
  • Return: A string of the elements in the container.
Example:
void daxErp_con2Str()
{
    // container declaration and initialization with 2 values
    container daxConBeta = ["Welcome", 8594]; 
    str charHolder;
    int conLength, cnt;
    ;

    // con2Str() function gets values as str comma separated from the container
    info(strFmt("Container daxConBeta con2Str() values are :- %1", con2Str(daxConBeta)));
}

11. str2con() Function

  • This a Global class method which converts the string elements into a container. The returned string cannot have more than 1000 characters.
  • Syntax: client server public static container str2con(str _value, [str _sep])
    • -value - the String
    • sep - The string to use as a separator between elements; optional.
  • Return: A container.
Example:
void daxErp_str2Con()
{
    container daxConDelta; // container declaration
    str charHolder;
    int conLength, cnt;
    ;

    // str2Con() function gets values str comma separated and converts to container
    // container initialization with 2 values using str2con()
    daxConDelta = str2con("Technical,Functional", ","); 
    info(strFmt("Container daxConDelta str2con() values are :- 
    %1 and %2", conPeek(daxConDelta, 1), conPeek(daxConDelta, 2)));
}

12. conView() Function

  • This a Global class method which retrieves or displays a form with a visual representation of a container as a tree. A form with the visual representation of a container if the _lookup parameter was true; otherwise, null.
  • Syntax: client server public static FormRun conView(container containerToShow, [str _caption, boolean _lookup])
    • containerToShow - The container to show in the form.
    • caption - A caption to use on the form; optional.
    • lookup - true to return the form without displaying it; false to display the form and return null.
  • Return: A string of the elements in the container.
Example:
void daxErp_conView()
{
    container daxConDelta; // container declaration
    str charHolder;
    int conLength, cnt;
    ;

    // str2Con() function gets values str comma separated and converts to container
    // container initialization with 2 values using str2con()
    daxConDelta = str2con("Technical,Functional", ","); 

    // to view the results in tree form use conView() global function
    conView(daxConDelta);
}

13. Container as dataType to store images/files...etc.

  • A container can be stored in the database. For example container is one of the field types to add a column to a table. This can be done only through AOT. Also container can store tablebuffer and BinData as a blob inside a container.
  • Below example shows how a container can be used to read the image from the file through dialog and store in a container and then write the image to a file location. This demonstrates how images are stored in the DAX application, this example can be further extended to be used on Forms and storing to database.
hand drawing best practice
Example:
private void daxErp_conImageExample()
{
    #define.jpeg('.jpg')
    #define.openMode("R")
    Dialog                  dialog;
    DialogField             dialogFileName;
    FileIoPermission        perm;
    FilePath                filePath;
    FileName                fileExt;
    FileName                fileName;
    Filename                fileNameWithPath;
    Bindata                 daxRead, daxSave;
    container               readPic;
    str                     daxBase64;
    ;

    dialog = new Dialog("DAX ERP TRAINING Example - 
    Read, Save and Write Image to and from the container");
    dialog.addGroup("Picture file upload");
    dialogFileName = dialog.addField("fileNameOpen", "Select JPEG image file to import"); 
    dialog.run();

    if (dialog.run())
    {
        fileNameWithPath = dialogFileName.value();
        if(!fileNameWithPath)
            throw error("Filename must be filled");

        [filePath, fileName, fileExt] = fileNameSplit(fileNameWithPath);
        if (fileExt != #JPEG)
            throw error(strFmt("The extension %1 is not allowed. 
            The correct extension should be %2.", fileext, #JPEG));

        perm = new FileIoPermission(fileNameWithPath, #openMode);
        if (perm == null)
        {
            throw error("No rights to perform this action");
        }

        perm.assert();
        daxRead = new BinData();
        daxSave = new BinData();

        if (daxRead.loadFile(fileNameWithPath))
        {
            // Reading and storing image into the container
            readPic = daxRead.getData();
        }
        CodeAccessPermission::revertAssert();
        // Writing the image to a file from the container
        daxSave.setData(readPic);
        daxBase64 = daxSave.base64Encode();
        AifUtil::saveBase64ToFile(@"C:\conExample\imageOutput.jpeg", daxBase64);
    }
}

businessman hand draws solving problem diagram

Differences between Container and Tempory Tables and Collection Classes

Let us look when to use a Container, Temporary Table and Collection Classes

  • Use a container to pass values between the client and server in a single method call and whendata/values are few records as values are stored and retrived in the container sequentially.
  • As I've said earlier containers have performance implications if not used appropriately and this is especially true when there is huge data manipulation in the container because for every X++ container statement new memory is allocated for creating new container object causing the performance bottlenecks.
  • Use Temporary Tables when you handle huge amount of data for faster retrival because indexes can be setup on the table and also table passing is "Pass by reference" which will give performance boost as only pointer to the object is passed unlike in container new container copy is passed causing memory issues.
  • Use Collection Classes [List, Set, Map, Struct] to store and retrieve not only simple types such as strings and integers, but also more complex types such as records and objects. Dynamics AX collection classes have been designed for storing objects. The classes are implemented in C++ to achieve the maximum performance (they are system classes - MSDN). Check out here for good overview and examples of Collection Classes Framework.

Tuesday, March 22, 2016

OCT 19 Microsoft Dynamics AX 2012 DIXF – Composite Entity Primer (XML format)


http://ax2012dmfdataimport.blogspot.in/2014/10/microsoft-dynamics-ax-2012-dixf.html

Microsoft Dynamics AX 2012 DIXF – Composite Entity Primer (XML format) – Part1
 
Purpose: The purpose of this document is to illustrate how to use Dynamics AX 2012 DIXF for import of custom data. In this particular primer I'll be focusing on Entity type = Composite Entity using XML file format.
 
Challenge: Data model changes in Dynamics AX related to high normalization and introduction of surrogate keys made import of data more complex. Data Import Export Framework for Microsoft Dynamics AX 2012 was designed and developed to address this challenge. Data Import Export Framework for Microsoft Dynamics AX 2012 provides architectural foundation for data import process as well as it ships with the numerous standard templates covering most important types of business data.
 
Solution: Dynamics AX 2012 ships with the number of DIXF templates which can be used in data import scenarios. For import of custom data Data Import Export Framework "Create a custom entity for data import/export" wizard which assists you in creating of required DIXF objects infrastructure. A composite entity groups multiple related entities together. In my example composite entity will combine header (AlexTable) and lines (AlexLine) entities together.
 
Data Model:
 
 Table Name
Table Description
AlexTable
Sample header table
AlexLine
Sample lines table
 
Data Model Diagram:
 
Sample Data Model
 
<![if !vml]><![endif]>
 
Process Overview:
 
 
Walkthrough:
 
Project1
 

Please note that I initially created 2 tables to implement a data model for this scenario

AlexTable table


AlexLine table


Processing group: Alex


Custom entity wizard: AlexTable

Welcome


Select a table: AlexTable


Select code generation parameters


Please note that for the sake of simplicity I created a fake display menu item AlexTable

Display Menu Item: AlexTable


It is also important to mention that while creating DIXF infrastructure for AlexTable I specified/marked "Is composite entity" checkbox [V]

Fields in the target table


Wizard complete


During creation of DIXF infrastructure for AlexTable table I was asked to confirm adding relation. This is required to automatically create table relationships between your newly created Staging table and necessary DIXF framework tables

Confirm adding relation


After Custom entity wizard is completed DMFAlexTableEntity project will be created automatically

Project: DMFAlexTableEntity


Please note that DMFAlexTableEntityClass class, DMFAlexTableEntity table and DMFAlexTableTargetEntity query have been generated by Create entity wizard automatically

Class: DMFAlexTableEntityClass


Query: DMFAlexTableTargetEntity


Table: DMFAlexTableEntity


Please note that because we marked "Is Composite entity" checkbox the system added RowId field to Staging table automatically. RowId field is used to link related tables records (header and lines in my scenario) as well as by DIXF errors handling mechanism (error table)

The following standard templates entities in the Data Import Export Framework include a RowID field that can be used in composite entities: DMFSalesTableEntity, DMFSalesLineEntity, DMFPurchTableEntity, DMFPurchLineEntity, DMFBOMEntity and DMFBOMVersionEntity.
For the sake of simplicity in this walkthrough I'm not going to introduce a function to link header record and lines records based on RowId field, and will import the data unlinked as is. However please see example below of how such function is implemented in a standard DMFSalesLineEntity template

/Classes/DMFSalesLineEntityClass/Methods/generateSalesTableLink
 
[DMFTargetTransformationAttribute(true),DMFTargetTransformationDescAttribute("@DMF580"),
DMFTargetTransformationSequenceAttribute(1)
,DMFTargetTransFieldListAttribute([fieldStr(DMFSalesLineEntity,SalesId)])
]
public container generateSalesTableLink(boolean _stagingToTarget = true)
{
    container        res;
    SalesTable       salesTable;
    SalesTableForm   salesTableForm;
 
    if (_stagingToTarget)
    {
        if(this.isCompositeEntity() && entity.RowId)
        {
            res = [(select firstOnly1 dmfSalesTableEntity
                where dmfSalesTableEntity.RowId == entity.RowId
                   && dmfSalesTableEntity.DefinitionGroup == entity.DefinitionGroup
                   && dmfSalesTableEntity.ExecutionId == entity.ExecutionId).SalesId];
        }
        else
        {
            …
        }
    }
    else
    {
        res = [target.SalesId];
    }
    return res;
}
 
Once you introduce this function you will also need to modify Source to Staging mapping to bring over RowId values from external source and then also Staging to Target mapping to add transformation (RowId -> RecId) based on this function

Please note that in my previous post I explained how you can implement such function using custom ID field which effectively plays the same role as RowId: http://ax2012dmfdataimport.blogspot.com/2013/03/microsoft-dynamics-ax-2012-dmf.html

Custom entity wizard: AlexLine

Welcome


Select a table: AlexLine


Select code generation parameters


Please note that in order to automatically add RowId field to a newly generated Staging table I
marked "Is Composite entity" checkbox

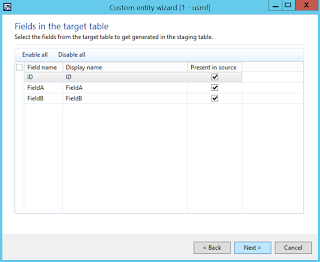
Fields in the target table


Wizard complete


I was asked to confirm adding relation again for DMFAlexLineEntity Staging table

Confirm adding relation


After Custom entity wizard is completed DMFAlexLineEntity project will be created automatically

Project: DMFAlexLineEntity


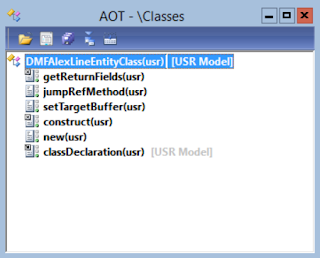
Please note that DMFAlexLineEntityClass class, DMFAlexLineEntity table and DMFAlexLineTargetEntity query have been generated by Custom entity wizard automatically

Class: DMFAlexLineEntityClass


Query: DMFAlexLineTargetEntity


Table: DMFAlexLineEntity


Target entities: Alex


Child entities: Alex


Now let's take a moment to speak about Source data formats

Data Import Export Framework does support XML format. And not only this, DIXF also allows you to use different types of XML structure: Element-based and Attribute-based

I'll start with Element-based XML structure. For this purpose I created XML1 Source data format shown below

Formats: XML1 Element-based XML structure


Once format is created now our goal will be to create appropriate XML Files for Consolidated data import. But before I do that I'll go ahead and generate Source files for each entity included into Consolidated entity
 
AlexTable: Generate source file


Generate source file wizard

Welcome


Display data


Please note that I selected XML type = XSD to generate XSD schema for AlexTable

Infolog


Here's how XSD schema looks like

AlexTable XSD schema


AlexTable XSD schema (text)
 
<?xml version="1.0" encoding="utf-8"?>
<xs:schema elementFormDefault="qualified" xmlns:xs="http://www.w3.org/2001/XMLSchema">
  <xs:element name="Document">
    <xs:complexType>
      <xs:sequence>
        <xs:element name="AlexTableEntity">
          <xs:complexType>
            <xs:sequence>
              <xs:element name="FieldA" nillable="true">
                <xs:simpleType>
                  <xs:restriction base="xs:string">
                    <xs:maxLength value="10" />
                  </xs:restriction>
                </xs:simpleType>
              </xs:element>
              <xs:element name="FieldB" nillable="true">
                <xs:simpleType>
                  <xs:restriction base="xs:string">
                    <xs:maxLength value="10" />
                  </xs:restriction>
                </xs:simpleType>
              </xs:element>
              <xs:element name="ID" nillable="true">
                <xs:simpleType>
                  <xs:restriction base="xs:string">
                    <xs:maxLength value="10" />
                  </xs:restriction>
                </xs:simpleType>
              </xs:element>
            </xs:sequence>
          </xs:complexType>
        </xs:element>
     </xs:sequence>
    </xs:complexType>
  </xs:element>
</xs:schema>
 
After that I also Generated sample file with XML type = XML

Generate sample file: XML type = XML


Here's the file for AlexTable

AlexTableEntity file


AlexTableEntity file (text)
 
<?xml version="1.0" encoding="utf-8"?><Document><AlexTableEntity><FieldA>String</FieldA><FieldB>String</FieldB><ID>String</ID></AlexTableEntity></Document>
 
Now I'll repeat this procedure for AlexLine table

Generate source file: AlexLine


Generate source file wizard

Welcome


Display data


Please note that I first selected XML type = XSD to generate XSD schema for AlexLine

Infolog


Here's how XSD schema for AlexLine looks like

AlexLine XSD schema


AlexLine XSD schema (text)
 
<?xml version="1.0" encoding="utf-8"?>
<xs:schema elementFormDefault="qualified" xmlns:xs="http://www.w3.org/2001/XMLSchema">
  <xs:element name="Document">
    <xs:complexType>
      <xs:sequence>
        <xs:element name="AlexLineEntity">
          <xs:complexType>
            <xs:sequence>
              <xs:element name="FieldC" nillable="true">
                <xs:simpleType>
                  <xs:restriction base="xs:string">
                    <xs:maxLength value="10" />
                  </xs:restriction>
                </xs:simpleType>
              </xs:element>
              <xs:element name="FieldD" nillable="true">
                <xs:simpleType>
                  <xs:restriction base="xs:string">
                    <xs:maxLength value="10" />
                  </xs:restriction>
                </xs:simpleType>
              </xs:element>
              <xs:element name="ID" nillable="true">
                <xs:simpleType>
                  <xs:restriction base="xs:string">
                    <xs:maxLength value="10" />
                  </xs:restriction>
                </xs:simpleType>
              </xs:element>
            </xs:sequence>
          </xs:complexType>
        </xs:element>
      </xs:sequence>
    </xs:complexType>
  </xs:element>
</xs:schema>
 
Finally I'll also generate sample file for AlexLine

Generate sample file: AlexLine


AlexLineEntity file


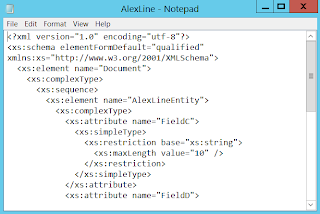
AlexLineEntity file (text)
 
<?xml version="1.0" encoding="utf-8"?><Document><AlexLineEntity><FieldC>String</FieldC><FieldD>String</FieldD><ID>String</ID></AlexLineEntity></Document>
 
Okay so now we know who the data in Element-based XML format should look like for AlexTable and AlexLine records

My next step would be to explore Attribute-based XML format. For this purpose I added another Source data format XML2 with XML structure = Attribute

Formats


Similarly to what I did for Element-based XML format I'll generate sample XML files for Attribute-based XML format scenario, so then we'll be able to compare 2 scenarios

Generate source file: AlexTable


Generate source file wizard

Welcome


Display data  (XML type = XSD)


Infolog


AlexTable XSD schema


AlexTable XSD schema (file)
 
<?xml version="1.0" encoding="utf-8"?>
<xs:schema elementFormDefault="qualified" xmlns:xs="http://www.w3.org/2001/XMLSchema">
  <xs:element name="Document">
    <xs:complexType>
      <xs:sequence>
        <xs:element name="AlexTableEntity">
          <xs:complexType>
            <xs:attribute name="FieldA">
              <xs:simpleType>
                <xs:restriction base="xs:string">
                  <xs:maxLength value="10" />
                </xs:restriction>
              </xs:simpleType>
            </xs:attribute>
            <xs:attribute name="FieldB">
              <xs:simpleType>
                <xs:restriction base="xs:string">
                  <xs:maxLength value="10" />
                </xs:restriction>
              </xs:simpleType>
            </xs:attribute>
            <xs:attribute name="ID">
              <xs:simpleType>
                <xs:restriction base="xs:string">
                  <xs:maxLength value="10" />
                </xs:restriction>
              </xs:simpleType>
            </xs:attribute>
          </xs:complexType>
        </xs:element>
      </xs:sequence>
    </xs:complexType>
  </xs:element>
</xs:schema>
 
Display data (XML type = XML)


AlexTableEntity file


AlexTableEntity file (text)
 
<?xml version="1.0" encoding="utf-8"?><AlexTableEntity><AlexTableEntity FieldA="String" FieldB="String" ID="String" /></AlexTableEntity>
 
Generate source file: AlexLine


Generate source file wizard

Welcome


Display data (XML type = XSD)


Infolog


AlexLine XSD schema


AlexLine XSD schema (text)
 
<?xml version="1.0" encoding="utf-8"?>
<xs:schema elementFormDefault="qualified" xmlns:xs="http://www.w3.org/2001/XMLSchema">
  <xs:element name="Document">
    <xs:complexType>
      <xs:sequence>
        <xs:element name="AlexLineEntity">
          <xs:complexType>
            <xs:attribute name="FieldC">
              <xs:simpleType>
                <xs:restriction base="xs:string">
                  <xs:maxLength value="10" />
                </xs:restriction>
              </xs:simpleType>
           </xs:attribute>
            <xs:attribute name="FieldD">
              <xs:simpleType>
                <xs:restriction base="xs:string">
                  <xs:maxLength value="10" />
                </xs:restriction>
              </xs:simpleType>
            </xs:attribute>
            <xs:attribute name="ID">
              <xs:simpleType>
                <xs:restriction base="xs:string">
                  <xs:maxLength value="10" />
                </xs:restriction>
              </xs:simpleType>
            </xs:attribute>
          </xs:complexType>
        </xs:element>
      </xs:sequence>
    </xs:complexType>
  </xs:element>
</xs:schema>
 
Display data (XML type = XML)


AlexLineEntity file


AlexLineEntity file (text)
 
<?xml version="1.0" encoding="utf-8"?><AlexLineEntity><AlexLineEntity FieldC="String" FieldD="String" ID="String" /></AlexLineEntity>
 
As you can see we got 2 different sets of sample files for AlexTable and AlexLine when using 2 different XML formats (Element-based and Attribute-based)

Also please note that Generate sample file function is not available for Composite entity, but you can execute it individually for each entity included into Composite entity. The logical reason would be that when having multiple entities included into a Composite entity you don't know the nature of the relationships between those tables upfront. That's why when having individual sample files for each entity you can combine them into a single Consolidated file for data import

All right! Now we familiarized ourselves with data format and we can switch to the creation of Consolidated files

Next step for me is to specify entities for processing group. Please note that once I specify Alex Composite entity in the first row the rest of 2 records will be added automatically because the system knows that Alex Composite entity consists of AlexTable and AlexLine

Select entities for processing: Alex 


I'll start with Element-based XML format scenario that's why I selected Source data format = XML1

This is how my Consolidated file for Element-based XML format looks like

AlexXMLElement file


AlexXMLElement file (text)
 
<?xml version="1.0" encoding="utf-8"?>
<Document><AlexTableEntity><AlexTableEntity_Id>1</AlexTableEntity_Id><FieldA>A1</FieldA><FieldB>B1</FieldB><ID>1</ID><RowId>1</RowId></AlexTableEntity><AlexLineEntity><AlexTableEntity_Id>1</AlexTableEntity_Id><FieldC>C1</FieldC><FieldD>D1</FieldD><ID>1</ID><RowId>1</RowId>
</AlexLineEntity></Document>
 
Please note that I specified RowId values for both header and line in order to be able to link them appropriately. Also I introduced "AlexTableEntity_Id" element to define a metadata relationship between AlexTable (header) and AlexLine (line). The idea is to introduce an element which names consists of the name of the parent/header entity (AlexTableEntity) and "_Id" and add this element to both header data and line data

The next step will be to specify this file for Composite entity in the list of Processing group entities and generate source mapping based on this file   

Generate Source Mapping


We've successfully generated mappings for AlexTable and AlexLine entities

Let's review these mappings

AlexTable Mapping (Visualization)


AlexTable Mapping (Details)


I'll also map RowId field to bring over the information about how header links to line(s)

AlexTable Mapping (Visualization)


AlexTable Mapping (Details)


AlexLine Mapping (Visualization)


AlexLine Mapping (Details)


Similar to above I'll also RowId field for the line

AlexLine Mapping (Visualization)


AlexLine Mapping (Details)


Now we can test what we've got by using Preview function

Preview AlexTable


Preview AlexLine


We can successfully see the data retrieved for AlexTable and AlexLine entities, so now we can execute the actual data import process

Copy data to Staging


Create a job ID for the staging data job


Staging data execution


Staging:-AlexXMLElement


Infolog


Great! We've successfully brought the data from source XML file over to Staging tables

DMFAlexTableEntity Table browser


DMFAlexLineEntity Table browser


The last step in this scenario will be to copy data to target

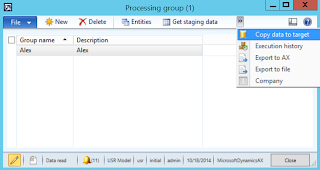
Processing group: Copy data to target


Select a job ID to run


Target data execution


Target:-AlexXMLElement


Infolog


Success! We should be able to see the data in target tables now

AlexTable Table browser


AlexLine Table browser


This concludes the first scenario with Element-based XML file

Now we can switch to Attribute-based XML file 

Select entities for processing: Alex 


This time my Consolidated file will look different

AlexXMLAttribute file


AlexXMLAttribute file (text)
 
<?xml version="1.0" encoding="utf-8"?>
<AlexTableEntity>
    <AlexTableEntity AlexTableEntity_Id="1" FieldA="A2" FieldB="B2" ID="1" RowId="1" />
    <AlexLineEntity AlexTableEntity_Id="1" FieldC="C2" FieldD="D2" ID="1" RowID="1" />  
</AlexTableEntity>
 
Please note that I still included the same information there, but in a different format. Thus I still have all data fields specified, RowID field and "AlexTableEntity_Id"

Generate Source Mapping


After we successfully generated Source mapping we can review them

AlexTable Mapping (Visualization)


AlexTable Mapping (Details)


Similar to all above I'll also map RowId field

AlexTable Mapping (Visualization)


AlexTable Mapping (Details)


AlexLine Mapping (Visualization)


AlexLine Mapping (Details)


Of course, I'll not forget about RowId field

AlexLine Mapping (Visualization)


AlexLine Mapping (Details)


Now we can test what we've got!

Preview AlexTable


Preview AlexLine


Everything shows up there fine! So we can proceed with Copy data to Staging

Copy data to Staging


Create a job ID for the staging data job


Staging data execution


Staging:-AlexXMLAttribute


Infolog


At this point we've successfully imported the data into Staging tables

DMFAlexTableEntity Table browser


DMFAlexLineEntity Table browser


Now we can copy data to target

Processing group: Copy data to target


Select a job ID to run


Target data execution


Target:-AlexXMLAttribute


Infolog


Now we can check the data in target tables

AlexTable Table browser


AlexLine Table browser


Success!

This concludes Attribute-based XML format scenario and this walkthrough!

Versions: Microsoft Dynamics AX 2012 R3, Microsoft Dynamics AX 2012 Data Import Export Framework

Summary: In this document I explained how to use Data Import Export Framework in Microsoft Dynamics AX 2012 in order to import custom data (header and lines). This approach is especially recommended for large scale data migrations and allows for much better performance comparing to usage of Microsoft Dynamics AX 2012 Excel Add-in. Data Import Export Framework in Microsoft Dynamics AX 2012 already ships with numerous standard templates for most important types of business data. Please note that DIXF ships with more than 150 ready-to-go templates. 

Author: Alex Anikiiev, PhD, MCP

Tags: Dynamics ERP, Dynamics AX 2012, DIXF, Data Import Export Framework, Data Import, Data Conversion, Data Migration, Composite Entity, XML, Attribute, Element
 
Note: This document is intended for information purposes only, presented as it is with no warranties from the author. This document may be updated with more content to better outline the concepts and describe the examples.


Export a copy of the standard user acceptance testing (UAT) database

 Reference link: Export a copy of the standard user acceptance testing (UAT) database - Finance & Operations | Dynamics 365 | Microsoft ...