Tuesday, March 21, 2017

Troubleshooting Data Import Export Framework issues & Conversion error

Known issues

There are some known issues which you should be aware of when you start using Data Import Export Framework or when you encounter some unexpected errors.
for more known issues you can use Issue search on Lifecycle services.

Start troubleshooting

When running the tool, you might notice some issues when data is incorrect. Initially you don’t know if errors are related to the source file or due to a setting or bug. How would you find out what is wrong? I will try to help you with the next notes. First of all, there can be errors at several stages.
  • Staging status
  • Target status
To be able to determine at what stage the processing stopped, you can view the status in the form Processing history.
DIXFTroubleshoot01

Staging errors

For the reproduction of this error I created a small source file for Inventory opening transactions with the next lines.
DIXFTroubleshoot06
When you look carefully at the contents, you may find already some incorrect and inconsistent values, but assume you have a file with thousands of lines, you will not check the lines yourself, wouldn’t you?
When there is an error on the Staging status you would expect to view some errors in the Error log. It could be the case that this error log does not have details to be able to see what is wrong with the import. For example, the option View error file is disabled and Staging log details does not provide any details.
DIXFTroubleshoot02
What would be needed to do to have details available? The answer can be found in a parameter and an import option.
DIXFTroubleshoot03
On the Data import/export framework parameters you can enable the option Create error file. This option will be used as default when you start a new import.
DIXFTroubleshoot04
The option Create error file is an additional option which is defaulted from the parameter setting. You can also change the setting on this step. When it is enabled, the details are captured and stored in Microsoft Dynamics AX. Note that this will have a performance penalty and would be useful for troubleshooting only. When running the import where the Create error file option is enabled, the View error file option is enabled.
DIXFTroubleshoot08
When clicking this button, AX will open a file which has only the lines that have an issue.
DIXFTroubleshoot07
In many cases you will not be able to note on which line which field(s) would have caused the error. So how can we find out about this?
Together with the generation of the error file, also detailed information has been captured. When you now open the Staging log details form, you will get the information about violations.
DIXFTroubleshoot05
Now we know that there are issues with values in the QTY and TRANSDATE columns. On purpose I used the comma instead of a dot for the decimal separator on one line. Also a month ’13’ does not exists. The date format depends on the Language locale field which can be setup on the Source data format.
If you have issues where the file looks fine, but no data is imported, you should check the Code page and Unicode settings on the Source data format. The source file might have another code page compared to the one that was setup in AX.

Target errors

When the staging data has been loaded successfully, you can view the staging records and validate the result manually and also use the validation to see if there would be any knows errors in upfront. The above used file has been modified to correct the data type violations, but the item numbers has been edited to have items in the file that does not exist in the Microsoft Dynamics AX demo company.
Using the Validate all option, no errors were reported. If there were errors, you can import a new file or correct the data in the staging details.
DIXFTroubleshoot09
As the validation is successful, the target step was executed. In this case I got an error. You can then go to the execution history to read the error details. In this example I got the next log.
DIXFTroubleshoot10
Using the Infolog, you can view all the details. In this case the Item ID is filled in the staging with a value that does not exists, so the data is not copied. Upon saving the record, the journal line is validated and raises this error. The error would be solved using the correct item numbers.

There is more

When using Data Import Export Framework, sometimes you can get some other errors. This post is intended to get you familiar with the data troubleshooting. Did you also get an error “Conversion failed when converting the nvarchar value ‘XXXX’ to data type int” on a custom built entity?
DIXFTroubleshoot11

If you want to learn about the cause and how to solve this, watch my next post coming. Make sure you subscribe if you don`t want to miss it!

When Microsoft designed the Data Import Export Framework in AX2012 it provided some entities out of the box. In many scenarios you will be missing an entity. You can create your own entities in the development environment from scratch or you can use the wizard which will create the basic objects required for your new entity. Sometimes you might run into errors and you should start troubleshooting. This post will provide a walkthrough how to create an entity. When finished this entity has an error due to conversion of an enumeration field. A solution for this problem is also provided at the end of this blog.

Create a new entity

Suppose you are in the need for a new entity based on the Inventory posting setup. The next steps should be taken to create a new one based on the table InventPosting.
  1. Start Data Import Export Framework > Common > Create a custom entity for data import/export.
  2. Fill the value InventPosting in the Table name field or select this table using the lookup. Then click Next.
    DIXFEnum01
  3. Specify the InventPosting value in the field Display menu item name. This is the menu item that will be used when you want to drill down to the target data from e.g. the staging view. Click Next.
    DIXFEnum02
  4. Select the fields which should be supported within the new entity. Continue and finish the wizard.
    DIXFEnum03
  5. During the creation of the entity you might be asked to create relations on the new staging table. Always answer this question with Yes. If you choose No, an important relation to the target table might be missing, which could cause the execution only able to insert records and not update existing records.
    DIXFEnum04
  6. During the process you might also see database synchronization starts. Don’t abort this process. It could lead to wrong string lengths in the DMF tables which holds the field mappings.
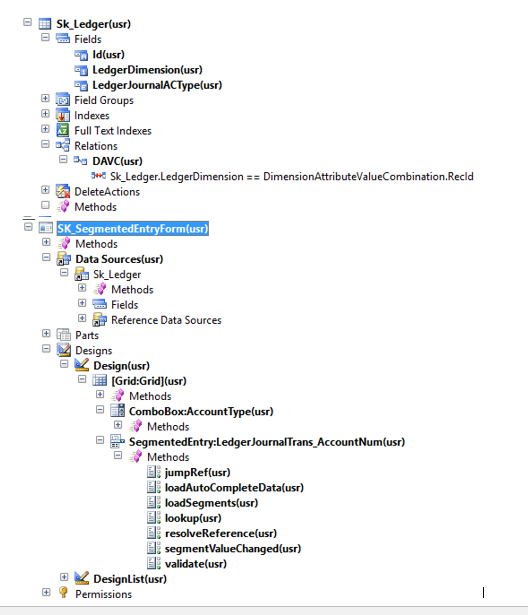
    The wizard created a new private project with all minimum required objects for the entity. For reference fields based on record-ID references, fields of a string type are created in the staging table. To be able to map the correct value, generateXXXXX methods are created to be able to handle the conversion.
    DIXFEnum05
  7. In this example the generateLedgerDimension method has been implemented fully with the correct coding. This might not be the case in every version of Data Import Export Framework in AX 2012. Compile the full project to see possible errors or open tasks.
    DIXFEnum06
  8. It appears that the method generateCategoryRelation has not been filled with the required coding. It has an //TODO section stating you have to implement the correct coding.DIXFEnum07
  9. Next to the coding, you also need to implement the DMFTargetTransFieldListAttribute correctly. This will provide knowledge to the entity which field(s) are used as input to find a record ID of the referenced table. The way to specify the fields are different in AX 2012 R3 and AX 2012 R2. Have a look at my blog post Change in data import export framework where this has been explained.
    The complete method might look like the next screenshot when you have completed the task.DIXFEnum08
  10. In the previous method, the fields for input are defined, also the return field must be specified in the getReturnFields method. As there is no //TODO section in this method created by the wizard, you might overlook this part, causing the outcome of this method not linked automatically to the target field. So add the coding for the return field for the Category relation.
    DIXFEnum09
  11. Compile the project, synchronize the tables and run an Incremental or full CIL compilation.
The entity is now ready to be setup in the Target entities form and use it in a Processing group.

Conversion error

As told in the introduction, this entity will raise errors. This is at the time of copying data to the target. What is the exact error? What causes it? How to solve this? This will be explained below.
For the test I did create a very small CSV file with some records that could be used in the demonstration company USMF.
DIXFEnum10The source to staging was executed without problems. Note that the correct string values for the Account type are inserted in the staging table.
DIXFEnum11When you want to execute the Copy data to Target step, the job fails. The next error will be visible.
DIXFEnum12
The error is stating that a nvarchar (string) field is not possible to convert to and int (integer). This is related to the enumeration fields in this table, for sure. But I learned that the enumeration conversion is working with the label, enumeration text and value number, so why is this failing?
SQL statement: SELECT T1.ITEMRELATION,T1.CUSTVENDRELATION,T1.TAXGROUPID,T1.INVENTACCOUNTTYPE,T1.ITEMCODE,T1.CUSTVENDCODE,T1.COSTCODE,T1.COSTRELATION,T1.CATEGORYRELATION,T1.LEDGERDIMENSION,T1.INVENTPROFILETYPEALL_RU,T1.INVENTPROFILETYPE_RU,T1.INVENTPROFILEID_RU,T1.SITECODE_CN,T1.SITERELATION_CN,T1.RECVERSION,T1.PARTITION,T1.RECID,T2.COSTRELATION,T2.CUSTVENDRELATION,T2.INVENTPROFILEID_RU,T2.ITEMRELATION,T2.SITERELATION_CN,T2.TAXGROUPID,T2.DEFINITIONGROUP,T2.ISSELECTED,T2.TRANSFERSTATUS,T2.EXECUTIONID,T2.ECORESCATEGORY_NAME,T2.ECORESCATEGORYHIERARCHY_NAME,T2.COSTCODE,T2.CUSTVENDCODE,T2.INVENTACCOUNTTYPE,T2.INVENTPROFILETYPE_RU,T2.INVENTPROFILETYPEALL_RU,T2.ITEMCODE,T2.LEDGERDIMENSION,T2.SITECODE_CN,T2.COSTGROUPID,T2.RECVERSION,T2.PARTITION,T2.RECID FROM INVENTPOSTING T1 CROSS JOIN DMFINVENTPOSTINGENTITY T2 WHERE ((T1.PARTITION=?) AND (T1.DATAAREAID=?)) AND ((T2.PARTITION=?) AND ((((((((((((((T2.RECID=?) AND (T1.SITERELATION_CN=T2.SITERELATION_CN)) AND (T1.SITECODE_CN=T2.SITECODE_CN)) AND (T1.INVENTPROFILEID_RU=T2.INVENTPROFILEID_RU)) AND (T1.INVENTPROFILETYPE_RU=T2.INVENTPROFILETYPE_RU)) AND (T1.INVENTPROFILETYPEALL_RU=T2.INVENTPROFILETYPEALL_RU)) AND (T1.COSTRELATION=T2.COSTRELATION)) AND (T1.COSTCODE=T2.COSTCODE)) AND (T1.TAXGROUPID=T2.TAXGROUPID)) AND (T1.CUSTVENDRELATION=T2.CUSTVENDRELATION)) AND (T1.CUSTVENDCODE=T2.CUSTVENDCODE)) AND (T1.ITEMRELATION=T2.ITEMRELATION)) AND (T1.ITEMCODE=T2.ITEMCODE)) AND (T1.INVENTACCOUNTTYPE=T2.INVENTACCOUNTTYPE))) ORDER BY T1.INVENTACCOUNTTYPE,T1.CUSTVENDCODE,T1.CUSTVENDRELATION,T1.ITEMCODE,T1.ITEMRELATION,T1.TAXGROUPID,T1.INVENTPROFILETYPEALL_RU,T1.INVENTPROFILETYPE_RU,T1.INVENTPROFILEID_RU
After debugging and looking at the SQL statement it is noticed that it is not caused by the conversion from the staging to the target value for enumeration fields, but the attempt to find an existing record. AX tries to join the target and staging table record in a query to find a possible record to update instead of creating a new one. This join is build based on the InventPosting relation on the staging table. Below you will see the fields marked which are incorrect. Why?
This relation is automatically created by the wizard based on the primary index of the target table. It used the replacement key index in case of a record ID index and if this replacement key is unique.
DIXFEnum13
But now the 64000 dollar question: How to solve it?
It is good to know that there are two attempts on finding an existing record. The first attempt is a query which is code based created where the staging and target table are linked using the table relation to the Target table. Just removing this relation will not solve the problem. It will then think there is no relation, so only records will be inserted at any time. The target table will then raise duplicate key errors.
Removing the incorrect fields from the relation is also not a good idea. It will then find the wrong existing records and will cause updating these existing records in stead of creating new records. This is the case when e.g. the values for Item and Customer relation are the same, but the only difference is in the Account type selection.
So now we have to know how and when the second attempt is executed and how this works. If the first attempt will not find any existing record, it will then find a record in the target table based on the replacement key of the target table. If there is no replacement key, it will try find an existing record based on primary index if this is not containing the Record ID field.
So we have to cheat AX to have no record found in the first attempt. For that, we need to delete all fields relations and create an impossible relation. E.g. a record ID from the staging table will be linked to the relation type field on the target table. Record IDs usually start with high numbers, so it will never find an existing record with low relation type values. In this way the first query method will have no existing record found and the second attempt is working correctly for this table.DIXFEnum14
If you make the changes and saves, compiles the table, you can rerun the target execution step which will now give the correct outcome without error.
Before you implement a similar cheat on your entities, make sure you test it carefully in a separate environment to make sure it will work correctly.

Monday, March 20, 2017

Tips about Data Import Export Framework performance


Architecture

When Microsoft started the investments to build the Data Import Export Framework (DIXF), they considered many performance choices. In addition it should provide a solution for the normalized data model where many tables are linked using a foreign key relation based on record IDs.
The source is now first loaded into a staging table without any business logic like events for validating data or add rules in insert methods. Then from the staging table the data is copied to the target table(s) where also business logic will be used. In an older version of Microsoft Dynamics AX, I had to deal with importing over 60000 fixed assets with each 4 value models, acquisition value and cumulated depreciation. So in total there were over 240000 value models and almost 500000 journal lines to be posted for the opening balance. Usually within one flat Excel file with a certain template I used a script to read the Excel lines, create assets, post acquisition values, depreciation values and then correct value models for the number of remaining depreciation periods. This script was working where at a maximum 400 assets were loaded.  The 240000 value models and 500000 transactions should take about 6-8 days for processing according to a calculation. Then we did also create a staging table which contained the Excel columns. From within AX we could process the business logic using the batch framework which solved the problem and the transactions could be converted within the given timeframe. So this architecture is a good implementation.
A very cool part of the DIXF framework is the use of SQL Server Integration Services (SSIS) to get the source into the staging tables. Microsoft did a real amazing good job here. The next picture shows the flow in general. It does not explain which part of the DIXF binary components (dll extensions) will take care of what part of the integration with SSIS.
Data Import Export Framework PerformanceThe setup of processing groups in AX is the base for SSIS packages which will pick up the source records and will put it with our without some basic transformations in the staging table. SSIS is very efficient and really a winner on performance for this type of tasks.

Performance tips

However Microsoft seems to have invested a lot in performance for the Data Import Export Framework, you might encounter some performance issues. You also need to be aware of some standard behavior and features to get the best performance on executing the import jobs. It would be recommended to not change objects when there is no real need for more performance. If you make changes on your environment based on this blog post, make sure you test it thoroughly. Changing your environment is at your own risk.

Staging tips

  • Index usage
    Make sure the unique index starts with the fields DefinitionGroup and ExecutionID. E.g. in various AX 2012 environments the staging table for Ledger opening balances (DMFLedgerJournalEntity) has an index which does not start with these fields. This will cause write and read action being slower. This is causing fragmented indexes. These two fields are key for Dynamics AX to have records grouped per processing group and execution steps. When these fields are not first fields in the index, it would be like searching in a phone book that is sorted on the phone number instead of the city and last name.
    When you use the wizard to create a new entity you have to check the primary index as the two mentioned fields may not be on the correct place. But like I said, also check existing entities.
    Performance tips Data Import Export Framework
    Disable obsolete indexes. This has less impact on performance compared to the previous tip. An obsolete index will be updated, but could potentially help when you filter within the staging history details. So try to estimate the impact before going into this direction.
  • Conversion/Auto generated
    When possible avoid usage of converting values and auto numbering. This will lead to some additional variables in the SSIS packages. If it would be possible to pre-fill some values in the source, it would be quicker during the source to staging process.

Target tips

  • Number of tasks when running in batch can be set to divide work over multiple batch threads and servers. If you have a file with a very large number of records, you can setup e.g. 24 tasks. When there are 240000 records it would create tasks with bundles of 10000 records. See also the next two items as these are related to this tip.
  • When possible you can increase the number of batch servers during data migration. Usually a customer environment can have e.g. 4 AOS servers where one was setup to run as a batch server. It would be possible to temporary add the other AOS servers to act also as batch server. Don’t install multiple instances of an AOS on the same server as they would then have to share the CPU capacity.
  • Maximum of threads on batch server. You can test if adding more threads or just reducing the number would be of benefit for the performance. The default value is 8. Some sites mentions that  2 threads per core, is recommended but you can try to play with this setting.
  • Prevent usage of Run business logic and validations. Use it only when really required. E.g. inventory journal entities need to have business logic enabled on insert methods. But when there is no need to call insert, update or validation methods, don’t enable them.
  • Temporary disable indexes on target table(s) which are not set to be unique. A nice example is the Journal lines table (LedgerJournalTrans. This table is a record holder with the number of indexes. When you disable them during the staging to target execution step, they will not be maintained during the data import. After the import has been completed, you can enable them which will rebuild the balances much faster that during write actions of the data import.
    Performance tips Data Import Export Framework

There is more…

There can be more possibilities of improving performance. Some settings can be related to SQL server tuning, but also the hardware you are using. Also there are two settings in the DIXF parameters which could cause performance problems when you change it to the wrong settings. One field is Data access mode. This field is a setting for SSIS. When it has NOT the fast load option, the records are committed one by one. So use the fast load setting. When a post man has 10 letters for the same address, he can insert them one by one or all at once. The last option is comparable with the fast load option. The Maximum insert commit size field is used to tell how many records will be inserted during before a commit command will be executed. E.g. the mailbox has a height to only insert 5 letters. Then 2 inserts are needed to put in the 10 letters. The default value is 2147483647 which actually means there is no limitation and al records will be committed at once. When you have e.g. a limited size for your TempDB on the SQL server, you may need to verify this setting to e.g. have 100000 records per commit action.
Performance tips Data Import Export Framework


Thursday, March 9, 2017

Question can we extend an interface class in abstract class ??

Hi Reader's


I have a Question can we extend an interface class in abstract class ??

Answer: Yes, we can Lets follow the Standard Class of AxSalesTable

class AxSalesTable extends AxInternalBase implements AxInventSiteDimensionable

X++ Method parameters actually pass by value or reference?

Hi Daxer's,

I have confusion regarding pass by value and pass by reference, so i have gone through this as below

Generally, parameter passing in DAX is always done by value except for class instances and records.

Major base types in Dynamics Ax
String = Assigned and passed by VALUE
Integer = Assigned and passed by VALUE
Real = Assigned and passed by VALUE
Date = Assigned and passed by VALUE
Enum = Assigned and passed by VALUE
Container = Assigned and passed by VALUE
Record = Assigned and passed by REFERENCE
Class instance (any object instanciated with ‘new()‘) = Assigned and passed by REFERENCE
AnyType = Assigned and passed by VALUE, even when holding a Record or Class instance
Guid = Assigned and passed by VALUE
Int64 = Assigned and passed by VALUE

X++ code to Check and Uncheck ExecuteBusinessOperationsInCIL based on userid

Hi Folks,

Today is my post about new concept and trick how to check and uncheck ExecuteBusinessOperationsinCIL based on Userid.

static void CILCHANGE(Args _args)
{
    UserInfo userinfo;
    ttsBegin;
        select forUpdate userinfo where userinfo.networkAlias == "dmsnxtl2.hd1";
    if( userInfo.DebugInfo ==268)
    {
        UserInfo.debuginfo=1292;
        UserInfo.update();
        info(strFmt("CIL Disabled"));
    }
    else
    {
        UserInfo.debuginfo=268;
        userinfo.update();
        info(strFmt("CIL Enabled"));
    }
    ttsCommit;

}

Happy Holli !!!

Monday, March 6, 2017

Work flow process in Ax 2012

WORKFLOW in MS Dynamics AX 2012
Workflow Configuration
There are three batch jobs that manage workflow processing. These jobs are all
run on the Application Object Server (AOS) using the Batch system. To set this
up, run System Administration > Setup > Workflow > Workflow
infrastructure configuration. Enter batch groups for each process. Batch groups
can be used to control which AOS instance each workflow batch job is run on.
 Create a Workflow Category
1. Open the AOT.
2. Expand the Workflow node.
3. Right-click on the Workflow Categories node and select New
Workflow Category. A new workflow category called Workflow
Category1 will be created.
4. Right-click on the newly created workflow category and select
Properties.
5. Change the name property to SalesCategory.
6. Change the label property to Sales workflows.
7. Change the Module property to SalesOrder.
8. Right-click on the newly created workflow category and select Save.
Create a Workflow Category (Step by Step with screen shot)
=================================================================================
 Create a Query
1. Open the AOT.
2. Right-click on the Queries node and select New Query.
3. Rename the query to SalesCreditLimitApproval.
4. Expand the newly created query.
5. Open another AOT window.
6. Expand Data Dictionary > Tables.
7. Find the table SalesTable.
8. Drag the SalesTable table to the Data Sources node of the
SalesCreditLimitApproval query.
9. Expand the SalesTable_1 node
10. Right-click on the Fields node and select Properties.
11. Set the Dynamics property to Yes and close the property sheet.
12. Right click on the SalesCreditLimitApproval query and select
Save.
Create a Workflow Category (Step by Step with screen shot)
==================================================================================
 Create a Workflow Type
1. Open the AOT.
2. Expand the Workflow node.
3. Right-click on the Workflow Types node and select Add-ins >
Workflow type wizard.
4. Click Next.
5. Enter SalesCreditLimitAppr in the name.
6. Enter SalesCategory in the Category.
7. Enter SalesCreditLimitApproval in the query.
8. Enter SalesTable in the Document menu item.
9. Click Next.
10. Click Finish. A development project with a number of newly created
elements will be displayed.
Create a Workflow Type (Step by Step with screen shot)
==================================================================================
 Enable Workflow on a Form
Add a WorkflowState Field
1. Open the AOT.
2. Expand Data Dictionary.
3. Right-click on Base Enums and select New Base Enum.
4. Rename the new enum to SalesCreditLimitApprovalStatus
5. Add four elements to the Enum called NotSubmitted, Submitted,
Approved, Rejected.
6. Expand Tables > SalesTable.
7. Right-click on Fields and select New > Enum.
8. Right-click on the newly created field and select Properties.
9. Change the Name property to CreditLimitApprovalStatus.
10. Change the EnumType property to
SalesCreditLimitApprovalStatus.
11. Right-click on the SalesTable node and select Save.
Add a WorkflowState Field(Step by Step with screen shot)
Enable Workflow on the Form
1. Open the AOT.
2. Expand Tables > SalesTable.
3. Create a new method and add the method in the following code.
4. Save the changes made to the table.
5. Expand Forms > SalesTableListPage > Designs.
6. Right-click on the design node and select Properties.
7. Change the WorkflowEnabled property to Yes
8. Change the WorkflowDatasource property to SalesTable.
9. Change the WorkflowType property to SalesCreditLimitAppr
10. Save your changes to the form.
boolean canSubmitToWorkflow(str _workflowType = '')
{
amountMST creditBalance;
custTable custTable;
;
if (!this.CreditLimitApprovalStatus ==
SalesCreditLimitApprovalStatus::NotSubmitted)
return false;
custTable = this.custTable_InvoiceAccount();
if (!custTable.CreditMax)
return false;
creditBalance = custTable.CreditMax -
custTable.balanceMST();
if (this.amountRemainSalesFinancial() +
this.amountRemainSalesPhysical() < creditBalance)
return false;
return true;
}
Enable Workflow on the form(Step by Step with screen shot)
Create a Submit to Workflow Class
1. Press Ctrl+Shift+P to open the development projects window.
2. Expand Private.
3. Double-click on SalesCreditLimitApprWFType development project.
4. In the development project find the class
SalesCreditLimitApprSubmitManager.
5. Create a new method called submit, and copy the following code for
this method.
6. Modify the code for the main method as shown in the following code.
7. Press F8 to save and compile the code.
8. Find the menu item SalesCreditLimitApprSubmitMenuItem.
9. Change the Label property to Submit.
10. Right-click on the SalesCreditLimitApprSubmitMenuItem menuitem and select Save.
void submit(Args args)
{
// Variable declaration.
recId recId = args.record().RecId;
WorkflowCorrelationId workflowCorrelationId;
// Hardcoded type name
WorkflowTypeName workflowTypeName =workflowtypestr(SalesCreditLimitAppr);
// Initial note is the information that users enter
when they
// submit the document for workflow.
WorkflowComment note ="";
WorkflowSubmitDialog workflowSubmitDialog;
SalesTable SalesTable;
// Opens the submit to workflow dialog.
workflowSubmitDialog = WorkflowSubmitDialog::construct(args.caller().getActiveWorkflowConfiguration());
workflowSubmitDialog.run();
if (workflowSubmitDialog.parmIsClosedOK())
{
recId = args.record().RecId;
SalesTable = args.record();
// Get comments from the submit to workflow dialog.
ttscommit;
}
catch(exception::Error)
{
info("Error on workflow activation.");
}
}
args.caller().updateWorkFlowControls();
}
note = workflowSubmitDialog.parmWorkflowComment();
try
{
ttsbegin;
workflowCorrelationId = Workflow::activateFromWorkflowType(workflowTypeName,recId,note,NoYes::No);
SalesTable.CreditLimitApprovalStatus = SalesCreditLimitApprovalStatus::Submitted;
// Send an Infolog message.
info("Submitted to workflow.");
Create a submit to Workflow Class (Step by Step with screen shot)
Create a Workflow Approval
1. Open the AOT.
2. Expand the Workflow node.
3. Right-click on Approvals and select Add-ins > Approval wizard.
4. Click Next.
5. Enter SalesCLApproval in Name.
6. Enter SalesCreditLimitApprDocument in Workflow document.
7. Enter Overview in Document preview field group.
8. Enter SalesTableListPage in Document menu item.
9. Click Next.
10. Click Finish. A development project with a number of newly created
elements is displayed.
11. Drag SalesCLApproval approval to the Supported elements node
on the SalesCreditLimitAppr workflow type.
12. Save your changes to the SalesCreditLimitAppr workflow type
Creating a Workflow Approval (Step by Step with screen shot)


 Create Event Handlers
Write code for Event Handler
1. Press Ctrl+Shift+P to open the development projects window.
2. Expand Private.
3. Double-click on SalesCreditLimitApprWFType development project.
4. In the development project find the class SalesCreditLimitApprEventHandler.
The following code needs tobe added to the completed method of the SalesCreditLimitApprEventHandler class.
public void completed(WorkflowEventArgs _workflowEventArgs)
{
SalesTable SalesTable;
select forupdate SalesTable where SalesTable.RecId ==
_workflowEventArgs.parmWorkflowContext().parmRecId();
if(SalesTable.RecId)
{
SalesTable.CreditLimitApprovalStatus =
SalesCreditLimitApprovalStatus::Approved;
SalesTable.write();
}
}
Add Element Level Event Handlers
1. In the AOT locate the class SalesCLApprovalEventHandler. This class was created by the Approval element wizard.
2. Add the following code in the returned method
3. Save your changes to the class.
4. In the AOT, right-click on the AOT node and select Incremental
CIL generation from X++
public void returned(WorkflowElementEventArgs
_workflowElementEventArgs)
{
SalesTable SalesTable;
ttsbegin;
select forupdate SalesTable
where SalesTable.RecId ==
_workflowElementEventArgs.parmWorkflowContext().parmRecId()
;
SalesTable.CreditLimitApprovalStatus =
SalesCreditLimitApprovalStatus::Rejected;
SalesTable.update();
ttscommit;
}
Author a Workflow
1. The workflow category we created in the first procedure needs to be
added to the main menu. Create a new display menu item called
WorkflowConfigurationSales.
2. Set the label to Sales workflows.
3. Set the object to WorkflowTableListPage.
4. Set the EnumTypeParameter to ModuleAxapta.
5. Set the EnumParameter to SalesOrder.
6. Add the new menu item to SalesAndMarketting > Setup menu.
7. In the property sheet for the new node in the menu, set the property
IsDisplayedInContentArea to Yes.
8. Save your changes to the menu.
9. Open the main menu and select Sales and Marketting > Setup > Sales workflows.
10. Click New.
11. Select SalesCreditLimitApprType and click Create workflow.
The workflow editor window opens.
12. Drag SalesCLApprovalApproval approval from the Workflow elements window to the Workflow window.
13. Drag the bottom node of the Start box to the top node of the Approval box.
14. Drag the bottom node of the Approval box to the top node of the End box.
15. Double click on the Approval box.
16. Click Step 1
17. Click Assignment.
18. On the Assignment type tab, select User
19. On the User tab, double click on Sammy
20. Click on Basic Settings and then enter a subject and instructions for the approval
21. Click on Close
22. Click on Save and Close
23. Enter some notes for the new workflow if you wish.
24. Select to Activate the new version
25. Click OK.
Authoring a Workflow (Step by Step with screen shot)


 Test the Workflow
1. In the application workspace, navigate to Accounts receivable > Common > Customers > All customers.
2. Select a customer and click Edit.
3. In the Credit and collections fasttab, set a credit limit.
4. Close the Customers form.
5. Go to Sales and marketting > Common > Sales orders > All sales orders.
6. Click New sales order. Enter the customer account modified that
you modified the credit limit for and click ok.
7. Enter items and quantities in the sales lines so that the balance of the customer plus the total amount on the lines is greater than the credit limit.
8. The workflow Submit button and dialog should appear.
9. Click the Submit button and enter a comment.
10. Wait for the batch job to process the workflow request. This should take one to two minutes.
11. Select Actions > History. You will see that the document is waiting for approval by the person you assigned to approve it.
12. Logon to windows as the Sammy using the Switch User option on the Start menu.
13. Start the Microsoft Dynamics AX client.
14. Open the Sales order form.
15. Click the workflow Actions button and select Approve.
16. Wait one to two minutes for the workflow engine to process the approval.
17. The workflow has now been approved.

Wednesday, March 1, 2017

How Segmented entry control works on form in AX 2012

HI Folks,

Today my post is about new concept how segmented entry control works in ax 2012

create table and form as below screenshot and follow the below code


public class FormRun extends ObjectRun
{
    DimensionDynamicAccountController ledgerDimensionAccountController;
}
public void init()
{
    super();
    ledgerDimensionAccountController = DimensionDynamicAccountController::construct(SK_Ledger_ds, fieldstr(SK_Ledger,LedgerDimension),
                                                                                    fieldstr(SK_Ledger,LedgerjournalActype));

}
public void jumpRef()
{
    ledgerDimensionAccountController.jumpRef();
}
public void loadAutoCompleteData(LoadAutoCompleteDataEventArgs _e)
{
    super(_e);
    ledgerDimensionAccountController.loadAutoCompleteData(_e);
}
public void loadSegments()
{
    super();

        ledgerDimensionAccountController.parmControl(this);
        ledgerDimensionAccountController.loadSegments();

}
public void lookup()
{
     switch(Sk_Ledger.LedgerJournalACType)
        {
            case LedgerJournalACType::Cust:
                CustTable::lookupCustomer(this);
                break;
            case LedgerJournalACType::Vend:
                VendTable::lookupVendor(this);
                break;
            default:
                super();
                break;
        }
}
public Common resolveReference()
{
    Common ret;

    ret = super();

    ret = ledgerDimensionAccountController.resolveReference();
    return ret;
}
public void segmentValueChanged(SegmentValueChangedEventArgs _e)
{
    super(_e);
    ledgerDimensionAccountController.segmentValueChanged(_e);
}
public boolean validate()
{
    boolean isValid;

    isValid = super();
    isValid = ledgerDimensionAccountController.validate() && isValid;

    return isValid;
}

Happy Daxing !!!


Export a copy of the standard user acceptance testing (UAT) database

 Reference link: Export a copy of the standard user acceptance testing (UAT) database - Finance & Operations | Dynamics 365 | Microsoft ...